2013. december 8., vasárnap

Dunkelgelb

Slowly progressing... I've tried Vallejo Model Air Dark Yellow as a dunkelgelb base but need some lightening later. Also made the side shield panels with the tiny locking mechanisms and plan to glue them in place in the near future. The tow cable of the kit was far too thick compared to the plastic parts so changed them to Karaya cables (0.6mm). The really joyful part is ahead when the lots of tiny, nerve-consuming sub-assemblies start to form the final form of the vehicle. And the winter holiday is ahead, yipp... 


2013. december 4., szerda

Primed

The build progress is slow but starts to be visible. Some detail shots can be found at my planetarmor build log. No time to build and blog to two places :) but I try to keep this blog updated...

2013. szeptember 15., vasárnap

Some more brass

Added some more stuff on the fenders, the hull is almost done. Now I play with the side shield locks, quite small parts but look cool when finished...


2013. augusztus 14., szerda

Toolbox

Some minor progress: the toolbox assembled. Somewhere soldered, other points glued, several times heart attack when the tiny parts fell from the tweezers to the desk or the floor... Slowly finishing the tools on the fenders. After that I cover the engine bay and the first primer will be applied - or maybe the fighting compartment assembled and then the primer? Who knows. It's a few months time till then :)


2013. június 29., szombat

Fender ready, soldering done

First time in my life I felt some success and joy when soldered the parts of the fenders. The result is not 100% but taught me some lessons and I had my first burning feeling on my fingers as well :)


2013. június 5., szerda

Fender

First time in my modelling life I feel that I succeeded a soldering task with satisfying results. I'm still working on the fenders and other bits and pieces which does not worth a full post here. But I'm quite proud of this fender...


2013. május 10., péntek

Slowly getting to shape...

And here I am again. During the recent weeks I've tried to use my spare minutes (even half hours sometimes) to work on the Flakpanzer. I prepared the body to adapt the PE fenders (under construction, trying to improve my soldering technique with little success...) which means I had to fill some holes and attachment cuts. Also painted the underside black because the engine air intake openings will be hidden under the deck and I wanted to be sure not to forget to shade them. Glued the side and back armor of the fighting compartment in place, made the two radios rack from really tiny PE stuff and decided to hide the driver's compartment. But still hesitating about the engine bay. I'm thinking about an action setting, firing flak, tension and so on. But that would need a closed hatch. However, I like the engine and would like to show it somehow... Life is full of hard questions.


2013. március 18., hétfő

Free hours

At the weekend we had a few hours of completely free time. That meant some progress with the flakpanzer. I cut&cleaned the running gear parts and assembled the hull sides. The drivers compartment has been closed and I just can not decide whether the engine bay hatches should be closed or not... All in all I enjoyed hours of undisturbed modelling, first time in 3 years...

2013. január 29., kedd

Driver's compartment ready

Just finished the driver's compartment at the weekend. The chipping and other fancy "weathering" stuff was intentionally kept to minimum as the vehicle was quite a new one. Some dry-brushing on the steering and braking system is hardly visible on the photos. Next time I'll spray a much lighter shade of both the green and red-brown but this time I didn't want to spend more time with a part which won't be visible. Now it comes to the funny parts: the hull. With lots of PE and worries.


2013. január 13., vasárnap

Paintjob

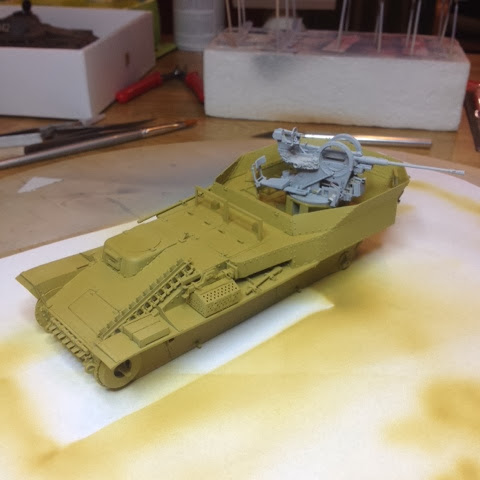
I've painted the drivers compartment. I hesitated a lot what colors to use as the vehicle is a late war model but based on the same basis as the Pz 38(t) tanks. But I'm quite sure that it wasn't constructed by "cutting down the tank parts and welding on the flak parts" method so the early war Czech paint scheme was not good for my purpose. Instead I decided to use the red-oxide floor, Elfenbein walls and green machinery as an alternative. No clue how exact it is historically (I guess not too much) but it seems to be a probable alternative - and not to forget: it won't be visible after finishing the model. The red-oxide color was a gloss paint so I had to overspray it several times with flat cote but with moderate succes. My explanation of the result is that the floor was greasy and oily... the wall is not purely white but the lighting and the camera of my iPhone resulted in a much lighter color than it is in reality.
 The green parts look nice with a little shine on them (though the paint was flat as indicated), maybe I could use a lighter shade as the weathering will not be too visible on this color. (note: the exact color codes must be updated to this blog entry)

And finally - after a few years of modelling I first time felt that I've cleaned my airbrush really thoroughly. Sounds a bit odd but it's true - now it shines like diamond and sprays like hell :)